Incubation
The first screen to appear shows a drop down box with a list of LOTs already created.
If the LOT does not appear, it is because it hasn’t been created.
Go to the LOT section either by clicking on the +LOT in the bottom navigation screen or go to the home page and click on the LOT button.
Once the LOT has been created, return to the Incubation section.
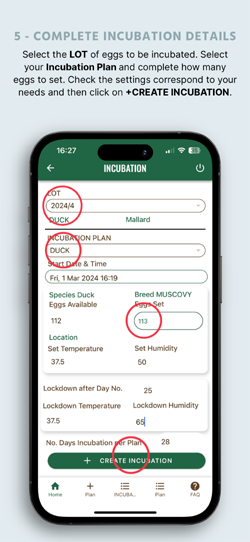
Section 1
LOT - a drop down bar will show you the list of LOTS of eggs you have created.
By selecting the LOT, you will see the species and breed in green, directly under the LOT reference ID.
Section 2
INCUBATION PLAN
INCUBATION PLAN - a drop down bar will show you the list of PLANS you have created. A PLAN includes the dates, temperatures, humidity, incubation times, species and breeds.
If the desired PLAN does not appear, it is because it hasn’t been created.
To create a PLAN, select the +Plan on the bottom navigation bar.
You can use a suggested Sample Plan. In this case, click on the top « USE SAMPLE PLAN » and select a plan which suits the species of bird. The drop down box will suggest common Temperatures and Humidity settings for the start and lockdown periods of incubation.
At this point, it is mandatory to give the PLAN a name. After clicking on the CREATE button, all the PLANS you have created will appear. You can, at this point, do a short edit to modify the main settings of humidity and temperatures. By clicking on the bigger pen symbol, you can not only edit the above, but also include up to three interventions - for example, intervention 1 could be only starting the turning as from day 3, intervention 2 cooling daily for 20 minutes up to lockdown, and so forth.
Once registered, the app will save these settings until you re edit the PLAN.
You cannot modify SAMPLE PLANS, only the plans you create.
You cannot use directly a SAMPLE PLAN ; only after creating the SAMPLE PLAN under your own reference name.
Once the plan has been created, you can return to INCUBATION and associate the PLAN to a LOT of eggs. You can either click on the Incubation symbol in the bottom navigation bar or return to the home page and click on the Incubation button.
CREATING AN INCUBATION LIST
On the Incubation form, after associating the LOT and INCUBATION PLAN, you can then set the start date & time. The number of eggs available to incubate is automatically shown here, with the species and breed of the bird. When creating the first incubation plan of a specific LOT of eggs, if all eggs are not allocated, then a new LOT must be created with the remaining eggs for the app to monitor them. At this point enter the number of eggs you wish to monitor in an incubator.
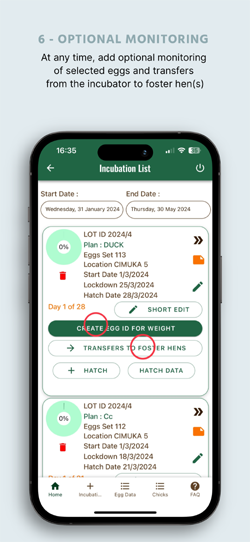
INCUBATION LIST
By clicking on the INCUBATION LIST in the bottom navigation bar, the app will show you the different INCUBATIONS in progress.
The list of incubations to be shown can be selected by adding a start and end date (at the top of the screen).
By clicking on the double chevrons, you will see the information you have entered for that particular incubation in progress. The progress is shown in the green circle with the pourcentage of time elapsed. The middle column shows the number of eggs set, the dates concerning the start, lockdown and expected hatch. Which day out of the number under incubation is also shown.
EGG ID
Another feature of the Incubation list is the possibility to monitor individual eggs.
All you need to do when you prepare your eggs for incubation is to give the individual egg(s) an ID, with its start weight.
Click on the CREATE EGG ID button.
The general LOT ID for the eggs will be brought forward. This is where you create the individual egg ID.
By monitoring individual eggs, you can check that you have the correct weight loss over the incubation period and modify your incubator settings accordingly.
Once you have the identified the eggs you wish to monitor, they can be viewed on the bottom navigation bar by selecting List Egg Data.
By selecting the LOT ID and the Egg ID in the top drop down boxes in the Egg Data List you will be shown the details concerning the egg. You can add information as the incubation progresses.
The pLOT symbol allows you to view this information as a chart. Several charts will appear. The pLOT chart will function after you have recorded several different dates with the relative weight.
INCUBATION NOTE SYMBOL
A sticky note button is shown in the box of a monitored LOT.
You can add a recording, by selecting the + Note symbol on the bottom navigation bar.
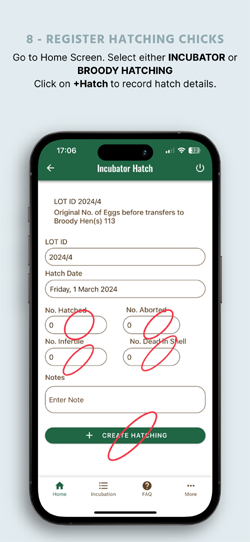
By clicking here, you have the possibility to complete the information of the status of eggs ; Infertile, Aborted, Dead in Shell.
After entering these numbers as and when the incubation progresses, the total number of rejections will be automatically calculated and deducted from your hatch success rate. A short note can be entered concerning the cause(s).
The note can be deleted or edited to add further rejections. The total number of rejections is shown at the end of the information concerning that particular LOT.
TRANSFERS TO FOSTER HEN
Some breeders like to transfer eggs under incubation to a Foster Hen.
By clicking on the Transfer button, a new screen will appear with the LOT ID brought forward.
A drop down box is available to select a Foster Hen. This could be a hen from your breeding stock or other. The ID in the drop down box is relative to the hens registered in your bird group. It is useful, if the foster hen is not part of your breeding program to add « Foster » to her ID. Click on Saver Transfer to register this new information to the LOT ID. The transfer list button is available in the bottom navigation bar.
CREATING AN INCUBATION LIST
On the Incubation form, after selecting the LOT and INCUBATION PLAN, you can then set the start date & time.
The number of eggs available to incubate is automatically shown here, with the species and breed of the bird.
At this point Enter the number of eggs you wish to monitor in an incubator.
INCUBATION LIST
By clicking on the INCUBATION LIST, the app will show you the different INCUBATIONS in progress.
The list of incubations to be shown can be selected by adding a start and end date.
By clicking on the double chevrons, you will see the information you have entered for that particular incubation in progress. The progress is shown in the green circle with the pourcentage, the number of eggs set, the dates concerning the start, lockdown and expected hatch. Which day out of the number under incubation is also shown.
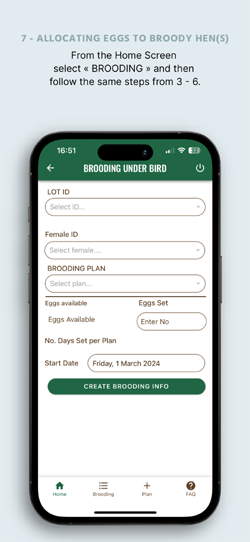
BROODING
This section concerns any eggs allocated to Foster Hens.
The ID of the Foster Hen (or Mother Hen if known) is created in the Bird Group section.
The number of eggs available that you have allocated in the LOT information is automatically brought forward and shown here.
To start recording, select your LOT ID, the Female ID, your Brooding Plan (i.e. a Plan appropriate to the species / breed, which you have previously created). Then enter the number of eggs to allocate to that particular bird and the start date.
By saving the entry, the brooding list will appear.
Here you can delete, edit, view the brooding information and record the number of eggs hatched under a broody hen. A short note to evaluate the hen or other information, can also be entered in the allocated field.